How to use Show on select
step 1
As described here, when you want to use show-on-select you need to add it to the form tag <_form show-on-select="show-on-select">
</_form>
step 2
We need to add an action of email as described here. <_form action="email" show-on-select="show-on-select">
</_form>
step 3
Let's add the neccessary starter fields where we can ask for a name, email and a textarea for the visitor to type their question. We will also add the messageonsuccess argument that will show a thank you message after the form has been submit. This is basically all plain HTML5.<_form action="email" show-on-select="show-on-select" messageonsuccess="We have received your inquiry, thank you!">
<_label for="name">Your name</_label>
<_input type="text" id="name" required="required" name="name" />
<_label for="email">Your email address</_label>
<_input required="required" id="email" type="email" name="email" />
<_label for="question">You inquiry</_label>
<_input required="required" type="textarea" id="question" name="question" />
<_input type="submit" value="Send" />
</_form>
step 4
Let's now add the show on select. We want to trigger a show on select on the textarea. So let add that first. We will call the trigger "content"...
<_label for="question">You inquiry</_label>
<_input required="required" show-on-select="content" type="textarea" id="question" name="question" />
...
step 5
What do we want the show-on-select do? Well, we want to have FlexForm show additional form elements when a certain word is typed inside the textarea. We will put these additional elements inside a DIV.
As we addedshow-on-select="content" on the textarea, we now need to add an argument to the DIV to tell FlexForm what to do.
First we addshow-on-select-trigger="content" thenshow-on-select-type="contains::installation" The last argument tells FlexForm to monitor the content of the DIV for when the word installation is typed inside the textarea.
The DIV will hold an additional select field, asking for the installation environment of the MediaWiki....
<_label for="question">You inquiry</_label>
<_input required="required" show-on-select="content" type="textarea" id="question" name="question" />
<div show-on-select-trigger="content" show-on-select-type="contains::installation">
<_label for="installoptions">If you have a question regarding a MediaWiki installation can you choose where the installation is taking place?</_label>
<_select name="installoptions" id="installoptions" >
<_input type="option" for="installoptions" value="Azure">Azure</_input>
<_input type="option" for="installoptions" value="AWS">AWS</_input>
<_input type="option" for="installoptions" value="Hosted server">Hosted server</_input>
<_input type="option" for="installoptions" value="Local">Local</_input>
<_input type="option" for="installoptions" value="not relevant">not relevant</_input>
</_select>
</div>
...
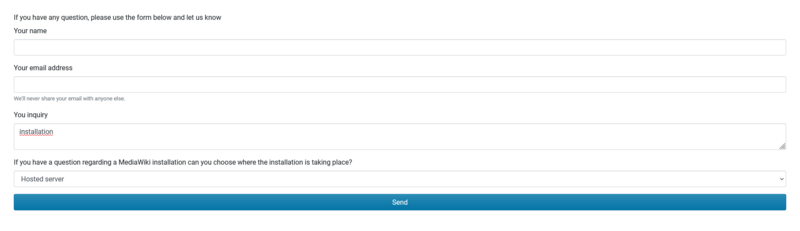
At this point the Form would look something like this:

When you type the word installation in the textarea, you get this :

step 6
If you have a look at the video, I add even another show-on-select on this form.
step 7
Let's tell FlexForm what to do with this form once it is submitted.
We wanted it to send an email and create a new page in the Wiki.
We need to add to two new lines to our form :<_form action="email" show-on-select="show-on-select" messageonsuccess="We have received your inquiry, thank you!">
<_email template="inquiry_mail_template" />
<_create mwwrite="inquiry-" mwoption="add_random" mwtemplate="inquiry" />
...
Read all about the email template here. All the detailed information on creating new pages in the Wiki can be found here. You can also watch the video, there I do explain in detail how the email template works and how the adding new pages work.
What we basically say is we want FlexForm to create a new page called inquiry- with a random number behind it. If you do not define what form fields should be added to the inquiry template, then FlexForm will add them all.
step 8
If you look at the video, I also show how to add some very simple styling to make the form look a bit better, like this screenshot :
step 9
Here's the complete code for this exampleIf you have any question, please use the form below and let us know
<_form action="email" show-on-select="show-on-select" messageonsuccess="We have received your inquiry, thank you!">
<_email template="inquiry_mail_template" />
<_create mwwrite="inquiry-" mwoption="add_random" mwtemplate="inquiry" />
<div class="form-group">
<_label for="name">Your name</_label>
<_input class="form-control" type="text" id="name" required="required" name="name" />
</div>
<div class="form-group">
<_label for="email">Your email address</_label>
<_input required="required" class="form-control" id="email" type="email" name="email" />
<small id="emailHelp" class="form-text text-muted">We'll never share your email with anyone else.</small>
</div>
<div class="form-group">
<_label for="question">You inquiry</_label>
<_input class="form-control" required="required" type="textarea" show-on-select="content" id="question" name="question" />
</div>
<div show-on-select-trigger="content" show-on-select-type="contains::installation">
<div class="form-group">
<_label for="installoptions">If you have a question regarding a MediaWiki installation can you choose where the installation is taking place?</_label>
<_select class="form-control" name="installoptions" id="installoptions" >
<_input type="option" for="installoptions" value="Azure">Azure</_input>
<_input type="option" for="installoptions" value="AWS">AWS</_input>
<_input type="option" for="installoptions" value="Hosted server">Hosted server</_input>
<_input type="option" for="installoptions" show-on-select="local" value="Local">Local</_input>
<_input type="option" for="installoptions" value="not relevant">not relevant</_input>
</_select>
</div>
<div show-on-select-trigger="local">
<div class="form-group">
<_label for="localoptions">With a local installation, could you tell us what operating system you are using?</_label>
<_select name="localoptions" class="form-control" id="localoptions" >
<_input type="option" for="localoptions" value="Windows">Windows</_input>
<_input type="option" for="localoptions" value="Mac">Mac</_input>
<_input type="option" for="localoptions" value="*unix">*unix</_input>
</_select>
</div>
</div>
</div>
<_input class="form-control btn btn-primary" type="submit" value="Send" />
</_form>
If you would like to see more examples, let us know on Discord, Facebook, Twitter or LinkedIn!
|